
Jan 16, 2023
Build a video gallery website into a CMS
Written by Zack Schwartz
Raytha is a powerful content management system that empowers you to easily create and customize websites. With just a bit of configuration and some HTML and CSS knowledge, you can take full advantage of the system's capabilities and push it beyond its default limits. Today we are going to create a video gallery website.
Prepare your video gallery layout
To create a visually appealing and user-friendly video gallery website, it's important to carefully plan the layout and design. For this project, we will be utilizing two views: a gallery list view, which will showcase thumbnails, titles, and duration of each video, and a detail view, where users can watch the video, read its description, and learn about its creator.
To achieve this design, we'll start by exploring available HTML samples online for inspiration. A great resource for this is the Bootstrap website, which offers a variety of examples, such as the Album example (https://getbootstrap.com/docs/5.2/examples/album/). Utilizing this as a starting point, we will then proceed to create two templates in Raytha, the Video List View and Video Detail View, by copying the HTML code and pasting it into the Raytha's admin portal.
To create these templates, access Raytha's admin portal and click on Templates in the left side navigation. Next, create two new templates that inherit from the _Layout template and paste in the copied HTML code. Name these templates Video List View and Video Detail View respectively. This will serve as a foundation for us to build upon and make any necessary customizations to fit our desired design.

To bring our templates to life and see how they look in action, we will make a few adjustments to our existing Posts content type. Firstly, we will rename it to Videos for convenience. Next, we will set the Video List View template as the default template for this content type. To test the Video Detail View template, we will update one of the sample posts to use this template. This will give us a clear understanding of how our templates will be displayed in the final website and help us identify any further modifications that need to be made.
You should be able to check out how your hard coded templates look and function on the live website. Go ahead and adjust the HTML and CSS as you need to in order to make sure everything lines up exactly the way you need it to.
Build out your content types
If we are pleased with the outcome of our templates and how they look, we can use this as a reference to identify all the necessary data points for building the data model for our video content types. In our example, we will need a featured image for the thumbnail, video title, duration, video description, the actual video, and the video creator. To keep our data structured, it would be best to create a separate Creator content type and link it to the Video content type via a one-to-one relationship field. This will allow us to easily manage multiple videos created by the same creator.
With all the necessary fields identified, we can move forward and create them, and also create a few sample pieces of video content to test and work with. This will give us a clear understanding of how the data is being displayed and what further adjustments may be needed.

Use liquid syntax to connect the templates to our data model
Now that we have established our hard-coded HTML templates and our data model with some sample data, it's time to take the next step and make our video gallery website truly dynamic. Instead of relying on the hard-coded HTML we initially used to set up the layout, we want our website to output data directly from our data model. To achieve this, we will head back to the Video List View and Video Detail View templates that we previously created in Templates, and modify them to use Liquid syntax to pull data from our Video content types.
This will involve using Liquid tags and variables to dynamically display the data from our fields, such as the video title, duration, and creator. By doing so, we will be able to easily update and manage our website's content without having to manually update the HTML code every time. This will make our website more efficient and user-friendly, allowing us to easily make updates and changes as needed.
The following is sample HTML with liquid syntax hooked up to my content types I used to create my video list view.
The following is sample HTML with liquid syntax hooked up to my content types I used to create my video list view.
<section class="ud-wrapper ud-page">
   <div class="container">
      <div class="row row-cols-1 row-cols-sm-2 row-cols-md-3 g-3">
         {% for item in Target.Items %}
         <div class="col">
            <div class="card shadow-sm">
               <img src="{{ item.PublishedContent.thumbnail.Text | raytha_attachment_url }}" height="225" />
               <div class="card-body">
                  <p class="card-text">{{ item.PublishedContent.title.Text }}</p>
                  <div class="d-flex justify-content-between align-items-center">
                     <a href="{{ item.RoutePath }}">View video</a>
                     <small class="text-muted">{{ item.PublishedContent.duration.Text }} mins</small>
                  </div>
               </div>
            </div>
         </div>
         {% endfor %}
      </div>
   </div>
</section>
And now my detail view.
<section class="ud-wrapper ud-page">
<div class="container">
<div class="d-flex justify-content-center">
<div class="col-lg-8">
<div><a href="/videos"><i class="lni lni-arrow-left"></i> Back to Videos</a></div>
<video width="100%" controls class="pt-2">
<source src="{{ Target.PublishedContent.video.Value | raytha_attachment_url }}">
Your browser does not support the video tag.
</video>
<h3 class="pt-2">{{ Target.PrimaryField }}</h3>
<span>9 mins</span>
<div class="pt-2">
{{ Target.PublishedContent.content.Text }}
</div>
<hr/>
<div class="card mb-3" style="max-width: 100%;">
<div class="row g-0">
<div class="col-md-4">
<img src="{{ Target.PublishedContent.creator.PublishedContent.profile_pic.Text | raytha_attachment_url }}" class="img-fluid rounded-start" alt="picture of the author">
</div>
<div class="col-md-8">
<div class="card-body">
<h5 class="card-title">{{ Target.PublishedContent.creator }} <span><a href="https://twitter.com/{{ Target.PublishedContent.creator.PublishedContent.twitter_handle.Text }}" target="_blank">@{{ Target.PublishedContent.creator.PublishedContent.twitter_handle.Text }}</a></span></h5>
<p class="card-text">{{ Target.PublishedContent.content.Text | truncate: 280 }}</p>
<p></p>
</div>
</div>
</div>
</div>
</div>
</div>
</div>
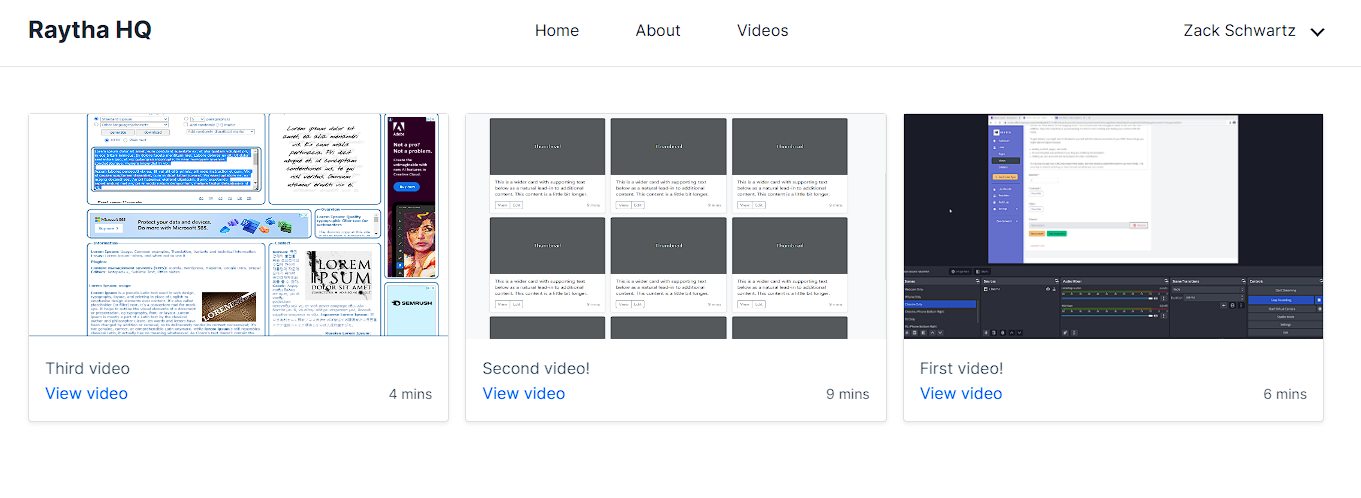
</section>The end result:

I hope this tutorial has provided you with valuable insights on how to effectively use Raytha to create a dynamic video gallery website with minimal effort. With the right approach and some basic HTML and CSS knowledge, you can quickly and easily assemble a visually appealing and functional website that utilizes the full capabilities of the Raytha platform. From setting up templates, to managing data, to customizing design, Raytha makes it easy to create a website that meets your specific needs and exceeds your expectations.
