
Mar 12, 2023
Integrating Maps into Your Directory Website
Written by Zack Schwartz
Intro
In this post we are going to explore creating a restaurant directory website that includes the locations of restaurants on a map via latitude and longitude coordinates. Restaurants are just an excuse to create the website, but the techniques learned in this tutorial will apply for any situation. In this tutorial, we'll guide you through the process of creating a directory website with Raytha CMS, our open source .NET CMS that allows for rapid development and deployment with very little code.
Step 1: Customize the content type with fields
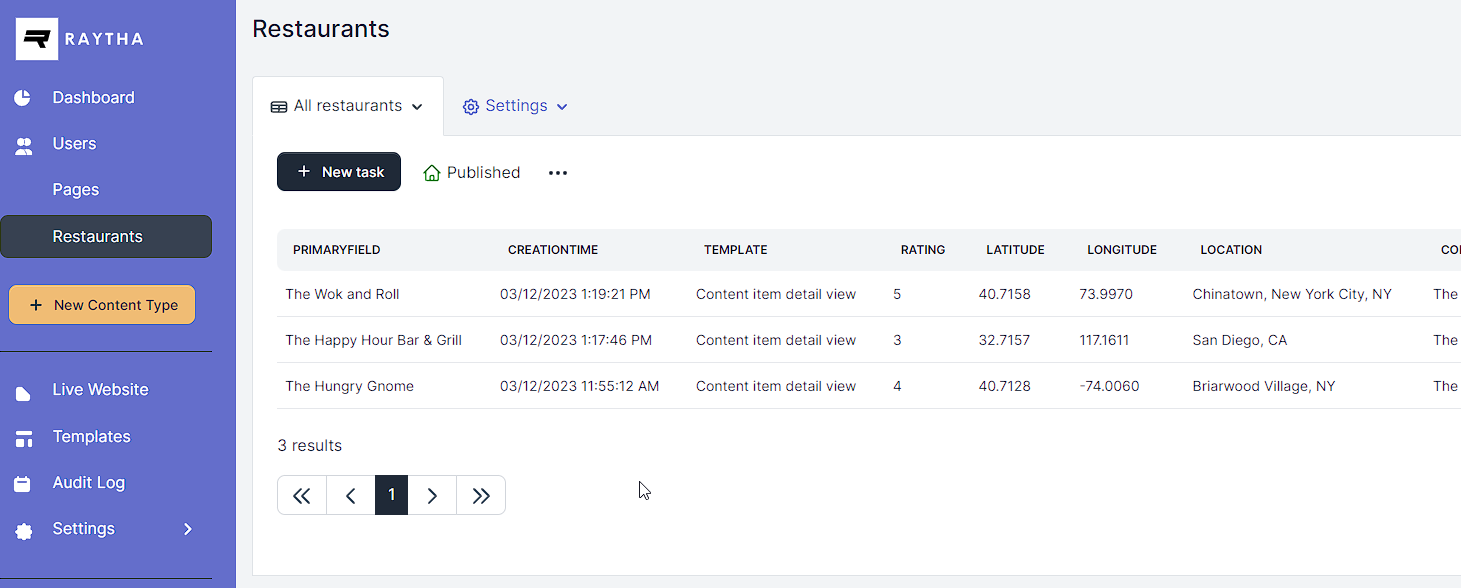
The first step in building your restaurant directory website is to set up the Raytha Content Types. Out of the box, Raytha comes with Pages and Posts types. We are going to re-purpose the Posts type and rename it to Restaurants and then add a bunch of fields we think are important for a directory such as restaurant name, description, rating, location, lat/long, and a photo. This is an intuitive process that takes only a few minutes.

Setup the content type
Step 2: Add some sample data
Back in the list view on the Raytha admin panel, we went ahead and created three sample restaurants so we have something to work with.
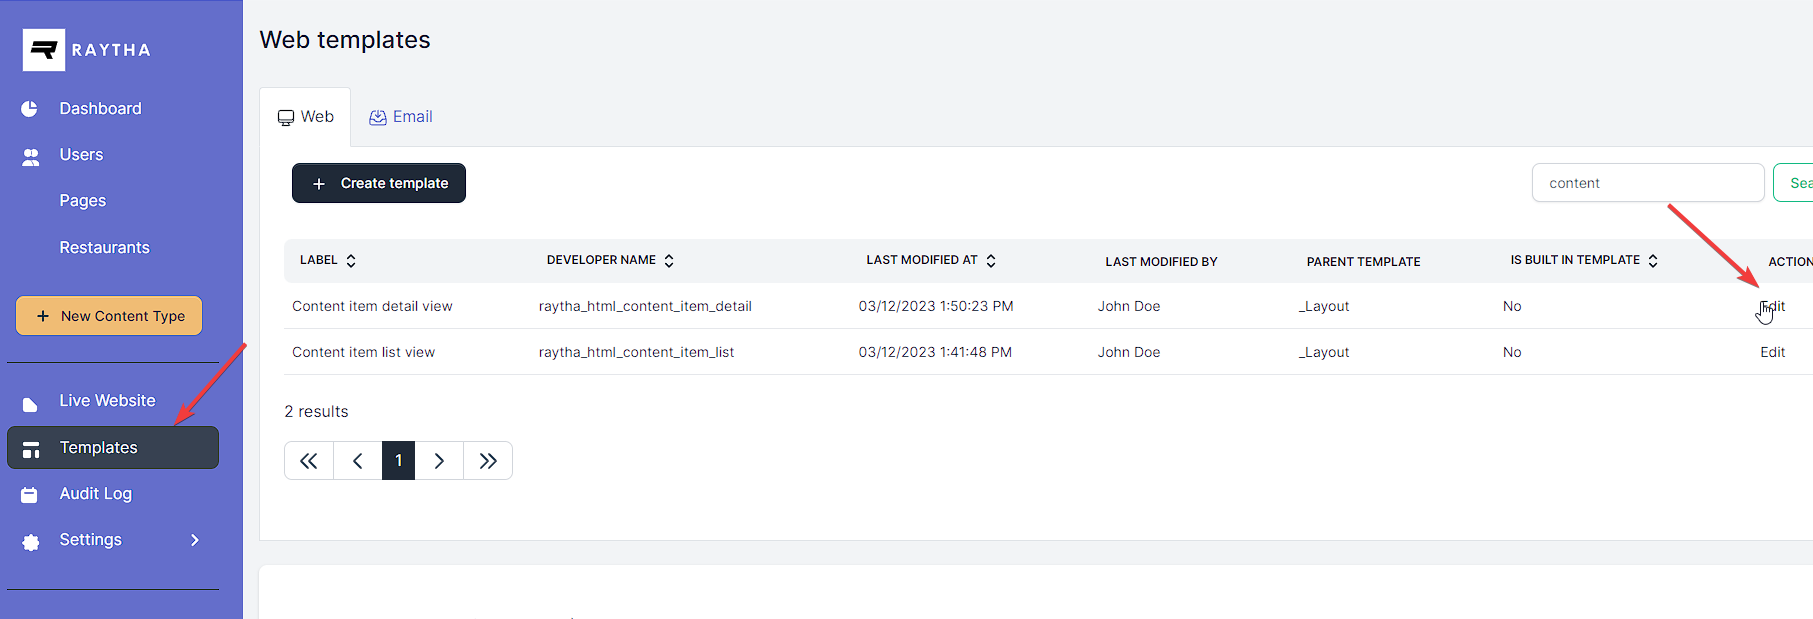
Step 3: Update the public site templates
Under Templates, we want to modify the Liquid / HTML templates to make use of the new data points we updated as part of our content type data model.
Here is the code for the list view:
Here is the code for the list view:
<section class="ud-wrapper ud-page">
<div class="container">
<div class="d-flex justify-content-center">
<div class="col-lg-8 shadow p-3">
<h3>{{ Target.Label }}</h3>
{% for item in Target.Items %}
<div class="ud-single-blog">
<div class="row">
<div class="col-lg-4">
<img class="pe-2 pb-2" src="{{ item.PublishedContent.photo.Text | raytha_attachment_url }}" alt="">
</div>
<div class="col-lg-8">
<div class="ud-blog-content">
<span class="ud-blog-date">
{% for i in (1..item.PublishedContent.rating.Value) %}⭐ {% endfor %}
</span>
<h4 class="ud-blog-title">
<a href="/{{ item.RoutePath }}">
{{ item.PrimaryField }}
</a>
</h4>
<p class="lead pb-2">{{ item.PublishedContent.location.Value }}</p>
{% if item.PublishedContent.content %}
<div class="ud-blog-desc">
{{ item.PublishedContent.content | strip_html | truncate: 280, "..." }}
<a href="/{{ item.RoutePath }}">read the full description</a>
</div>
{% endif %}
</div>
</div>
</div>
</div>
<hr/>
{% endfor %}
<nav aria-label="page navigation" class="py-4">
{% if Target.TotalCount == 1 %}
<p>{{ Target.TotalCount }} result</p>
{% else %}
<p>{{ Target.TotalCount }} results</p>
{% endif %}
<ul class="pagination">
<li class="page-item {% if Target.PreviousDisabledCss %}disabled{% endif %}">
<a href="/{{ Target.RoutePath }}?pageNumber={{ Target.PageNumber | minus: 1 }}" class="page-link">
«
</a>
</li>
{% if Target.FirstVisiblePageNumber > 1 %}
<li class="page-item disabled">
<a class="page-link">...</a>
</li>
{% endif %}
{% for i in (Target.FirstVisiblePageNumber..Target.LastVisiblePageNumber) %}
<li class="page-item {% if Target.PageNumber == i %}active{% endif %}">
<a href="/{{ Target.RoutePath }}?pageNumber={{ i }}" class="page-link">{{ i }}</a>
</li>
{% endfor %}
{% if Target.LastVisiblePageNumber < Target.TotalPages %}
<li class="page-item disabled">
<a class="page-link">...</a>
</li>
{% endif %}
<li class="page-item {% if Target.NextDisabledCss %}disabled{% endif %}">
<a href="/{{ Target.RoutePath }}?pageNumber={{ Target.PageNumber | plus: 1 }}" class="page-link">
»
</a>
</li>
</ul>
</nav>
</div>
</div>
</div>
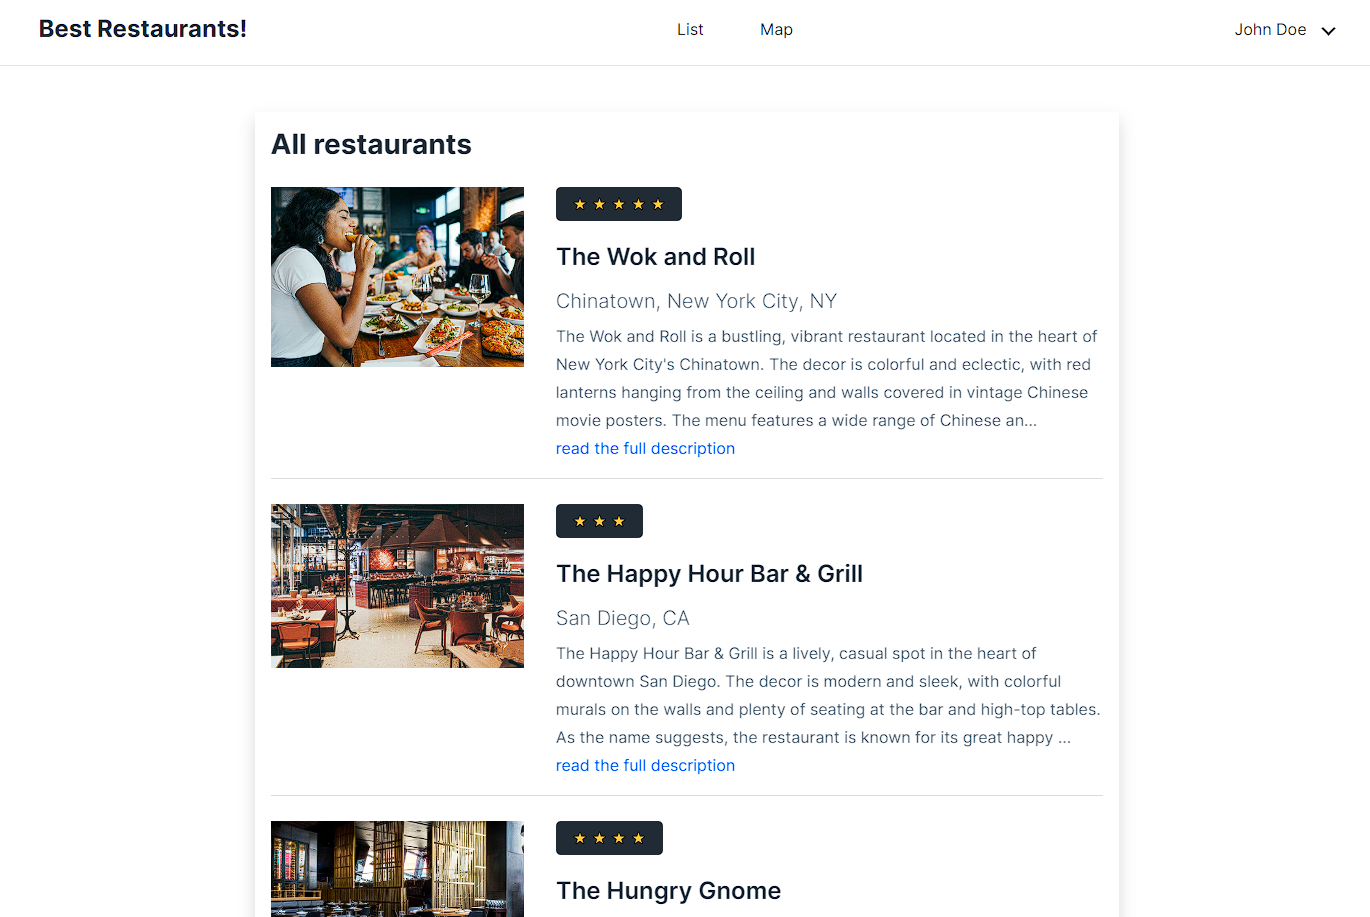
</section>This results in the list view nicely showing the photos, ratings, location, and truncated description:
Now for the detail view, we also want a map to appear. We need to add some code to the _Layout template to include a script and css:
    <script src="https://ajax.googleapis.com/ajax/libs/jquery/3.5.1/jquery.min.js"></script>
    <script src="https://cdn.jsdelivr.net/npm/[email protected]/dist/leaflet.js"></script>
    <link rel="stylesheet" href="https://cdn.jsdelivr.net/npm/[email protected]/dist/leaflet.css" />
    <style>
      #mapid {
        height: 600px;
      }
    </style>
And then in the Content Detail View we have:
<section class="ud-wrapper ud-page">
<div class="container">
<div class="d-flex justify-content-center">
<div class="ud-single-blog">
<div class="pb-4"><a href="/"><i class="lni lni-arrow-left"></i> Back to Restaurants</a></div>
<div class="row">
<div class="col-lg-4">
<img class="pe-2 pb-2" src="{{ Target.PublishedContent.photo.Text | raytha_attachment_url }}" alt="">
</div>
<div class="col-lg-8">
<div class="ud-blog-content">
<span class="ud-blog-date">
{% for i in (1..Target.PublishedContent.rating.Value) %}⭐ {% endfor %}
</span>
<h4 class="ud-blog-title">
<a href="/{{ Target.RoutePath }}">
{{ Target.PrimaryField }}
</a>
</h4>
<p class="lead pb-2">{{ Target.PublishedContent.location.Value }}</p>
{{ Target.PublishedContent.content.Text }}
</div>
</div>
</div>
<div class="row">
<div id="mapid"></div>
<script>
var map = L.map("mapid").setView([{{ Target.PublishedContent.latitude.Value }}
, {{ Target.PublishedContent.longitude.Value }}], 6);
L.tileLayer("https://{s}.tile.openstreetmap.org/{z}/{x}/{y}.png", {
attribution: "Map data © OpenStreetMap contributors",
maxZoom: 18,
}).addTo(map);
var pins = [
{
coords: [{{ Target.PublishedContent.latitude.Value }}, {{ Target.PublishedContent.longitude.Value }}],
description: "{{ Target.PublishedContent.location.Text }}",
}
];
for (var i = 0; i < pins.length; i++) {
var pin = pins[i];
L.marker(pin.coords)
.addTo(map)
.bindPopup(pin.description);
}
</script>
</div>
</div>
</div>
</div>
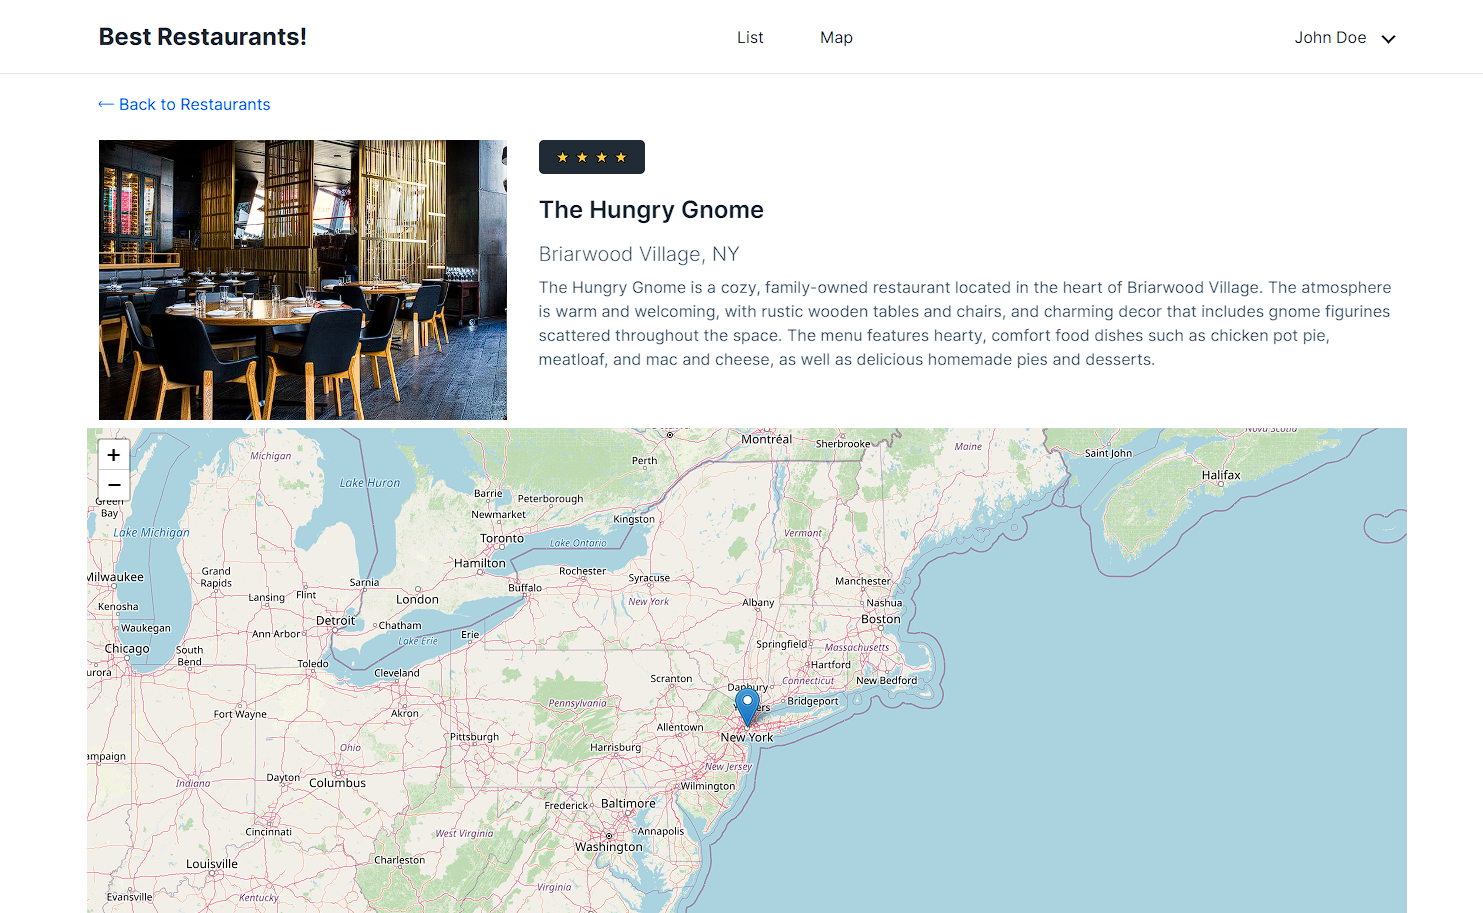
</section>And this is our result!
Step 4: Integrating a map with latitude and longitude coordinates
The above only solves the map for a single item on a detail view. But what if we also wanted a map that listed all the locations of the restaurants on the directory? We have to perform 2 more steps:
1. Create a new Map List Template
2. Create a new list view on the admin portal and set the template to the Map List Template.
Here is our code for the new template we created that inherits from _Layout template.
1. Create a new Map List Template
2. Create a new list view on the admin portal and set the template to the Map List Template.
Here is our code for the new template we created that inherits from _Layout template.
<section class="ud-wrapper ud-page">
   <div class="container">
      <div class="d-flex justify-content-center">
         <div class="col-lg-8 shadow p-3">
            <h3>{{ Target.Label }}</h3>
            <div id="mapid"></div>
            <script>
            var map = L.map("mapid").setView([39.8283, -98.5795], 1);

            L.tileLayer("https://{s}.tile.openstreetmap.org/{z}/{x}/{y}.png", {
                attribution: "Map data © OpenStreetMap contributors",
                maxZoom: 18,
            }).addTo(map);

            var pins = [
                {% for item in Target.Items %}
                {
                    coords: [{{item.PublishedContent.latitude.Value}}, {{item.PublishedContent.longitude.Value}}],
                    description: "<a href=\"/{{ item.RoutePath }}\">{{ item.PrimaryField }} | {{ item.PublishedContent.location.Value }}</a>",
                },
                {% endfor %}
            ];

            for (var i = 0; i < pins.length; i++) {
                var pin = pins[i];
                L.marker(pin.coords)
                .addTo(map)
                .bindPopup(pin.description);
            }
            </script>
         </div>
      </div>
   </div>
</section>
Take note that we are using Liquid For Loop to generate the list of coordinates.
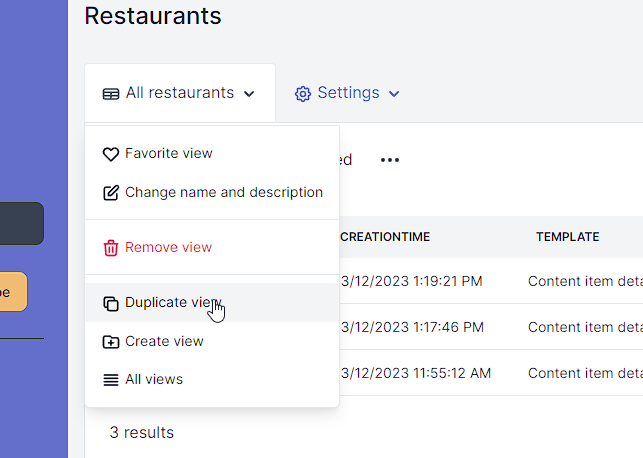
We then duplicate our list view and create a new one like so:
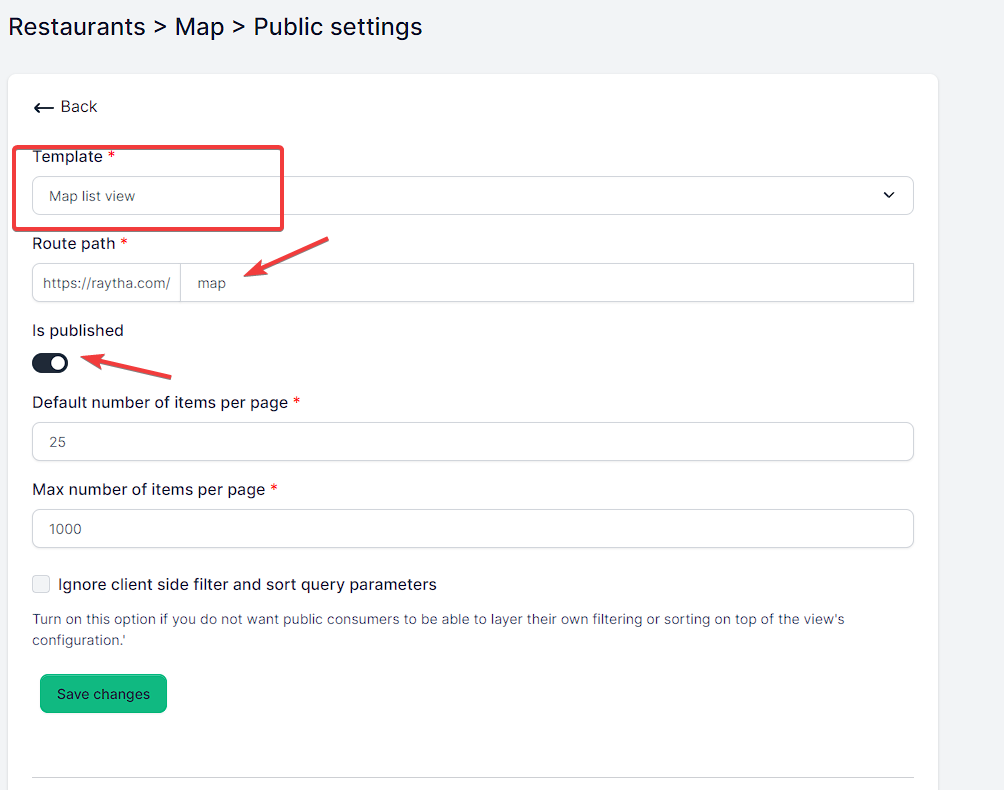
And then set the Public Settings accordingly.
Now you can link to this list view and it will show the map list view!
Now you can link to this list view and it will show the map list view!
Conclusion
Creating a directory website with Raytha CMS is a straightforward process that can be completed quickly and easily. With its built-in tools and third-party integration capabilities, Raytha CMS makes it simple to create a professional-grade website that includes a map with latitude and longitude coordinates for each restaurant. By using liquid syntax for HTML templates, you can create dynamic content that is tailored to your users' needs. So, what are you waiting for? Get started today and create the restaurant directory website of your dreams!
