Back to Blog
Feb 18, 2023

Recreating 'Reddit Live' with .NET and SignalR

Written by Zack Schwartz


Intro

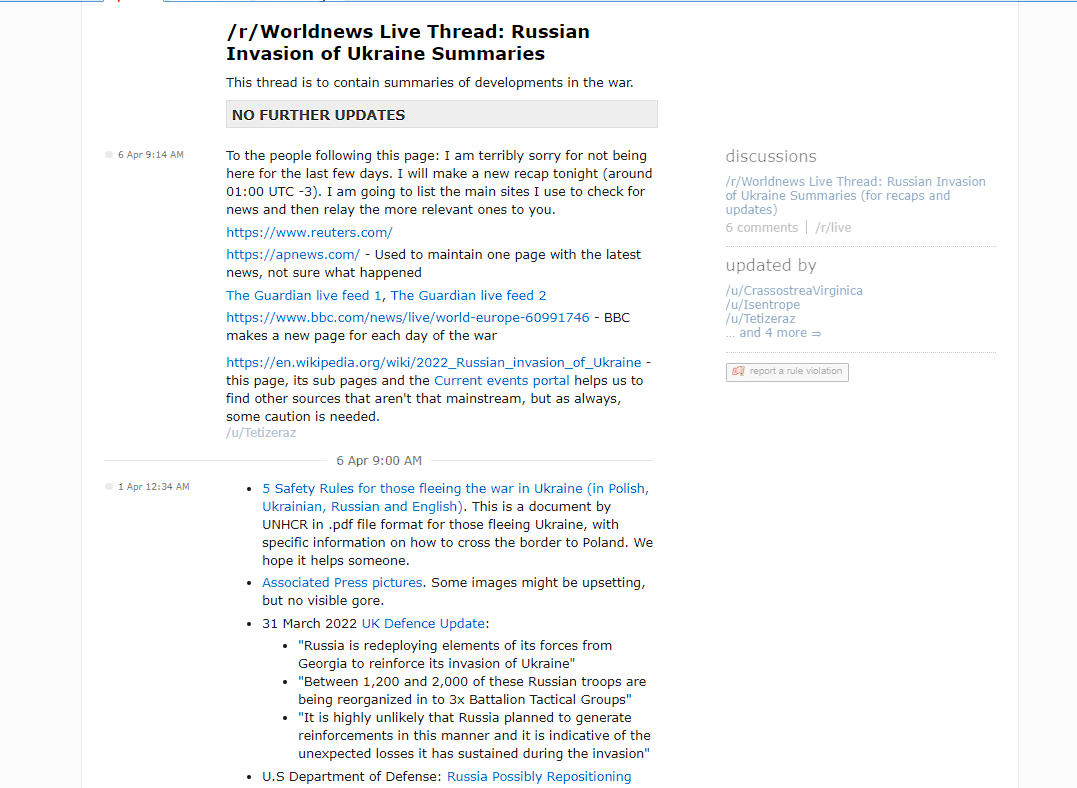
Reddit Live is a unique feature of reddit.com that comes into play during serious ongoing news events with rapidly evolving information. Essentially, volunteers create a Live Thread where they constantly provide updates to visitors who are eagerly following the event. One instance where Reddit Live was heavily utilized was during Russia's invasion of Ukraine, which had a live thread dedicated to it here: https://www.reddit.com/live/18k2410w0vhnd/.

Screenshot of a Reddit Live thread


There are a plethora of ways for people to consume news - through Twitter, websites, television, Reddit, and more. Personally, I have found Reddit Live threads to be a helpful tool due to their simple interface and ability to aggregate news and links from multiple sources in one place.

Today, we are embarking on a project to rebuild Reddit Live using the Raytha platform. Our goal is to push its capabilities to the limits and then take it a step further by incorporating SignalR to achieve real-time functionality without the need for visitors to refresh the page. This will enhance the user experience and make our homegrown version of Reddit Live even more valuable during breaking news events.

Create the data model for breaking news updates

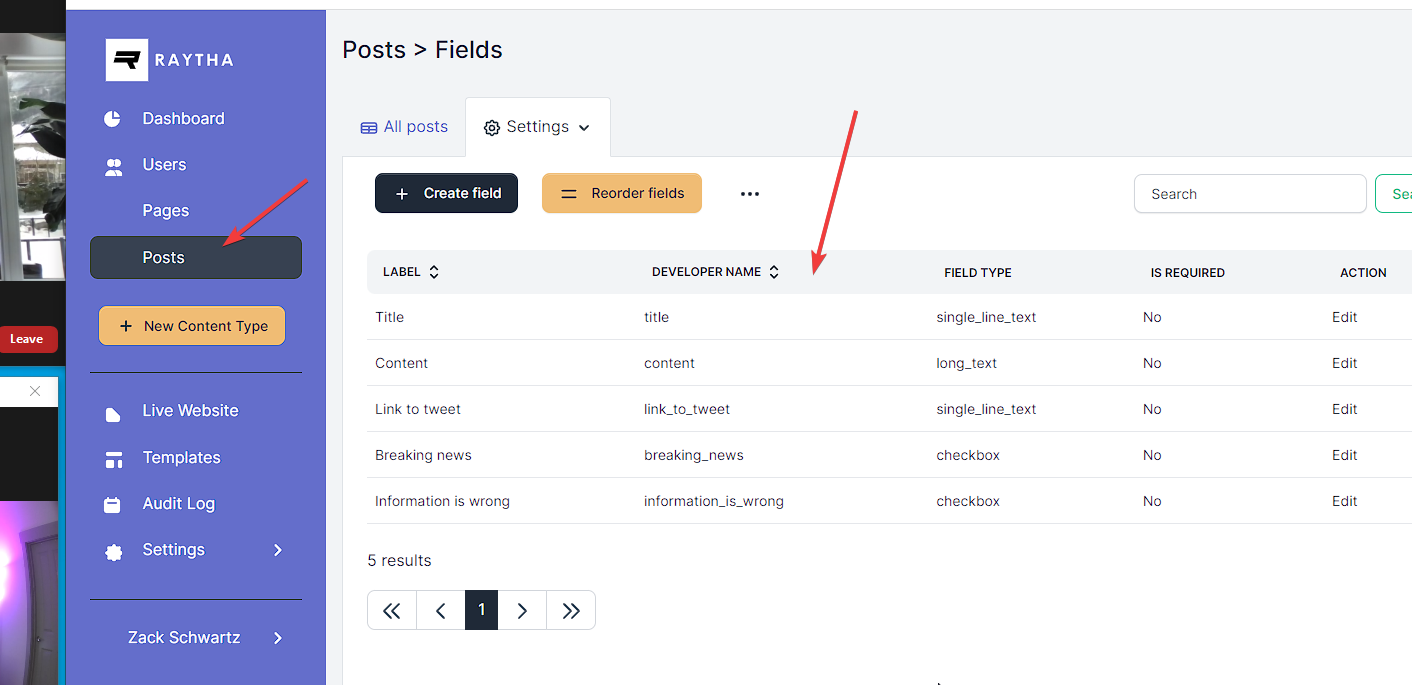
Let's begin by setting up a fresh copy of the Raytha platform, which already comes equipped with two content types: Pages and Posts. For our project, we'll repurpose the Posts content type and add some essential fields for building our own Reddit Live.

By default, Raytha provides three fields for Posts:

  • Title
  • Content
  • CreationTime

However, we'll also include the following three fields:

  • Link to a tweet: This allows us to easily embed tweets into the Live thread.
  • Breaking news (checkbox): When this box is checked, we can add a badge to indicate that the post is particularly significant and contains an important update in the ongoing news cycle.
  • Information was wrong (checkbox): By checking this box, we'll let visitors know that the information in the post is no longer accurate.

With these additional fields, we'll be able to make our Reddit Live thread more informative and efficient for visitors who rely on it for real-time updates.

Screenshot of Posts type with new fields


Update the public facing Liquid templates

Now that we've finalized our data model, it's time to update the web templates in Raytha using liquid syntax. To get started, I created several sample posts to demonstrate how our different options will be displayed.

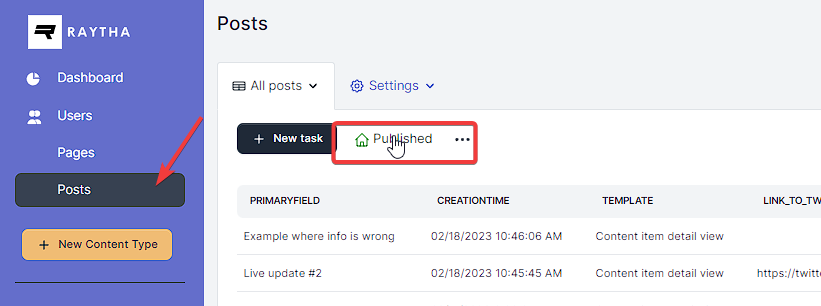
Before we edit the code, we do want to set the Posts' list view as the home page, so we went ahead and published the list view and set it as the default home page when you visit the website.

Screenshot of publishing posts list view


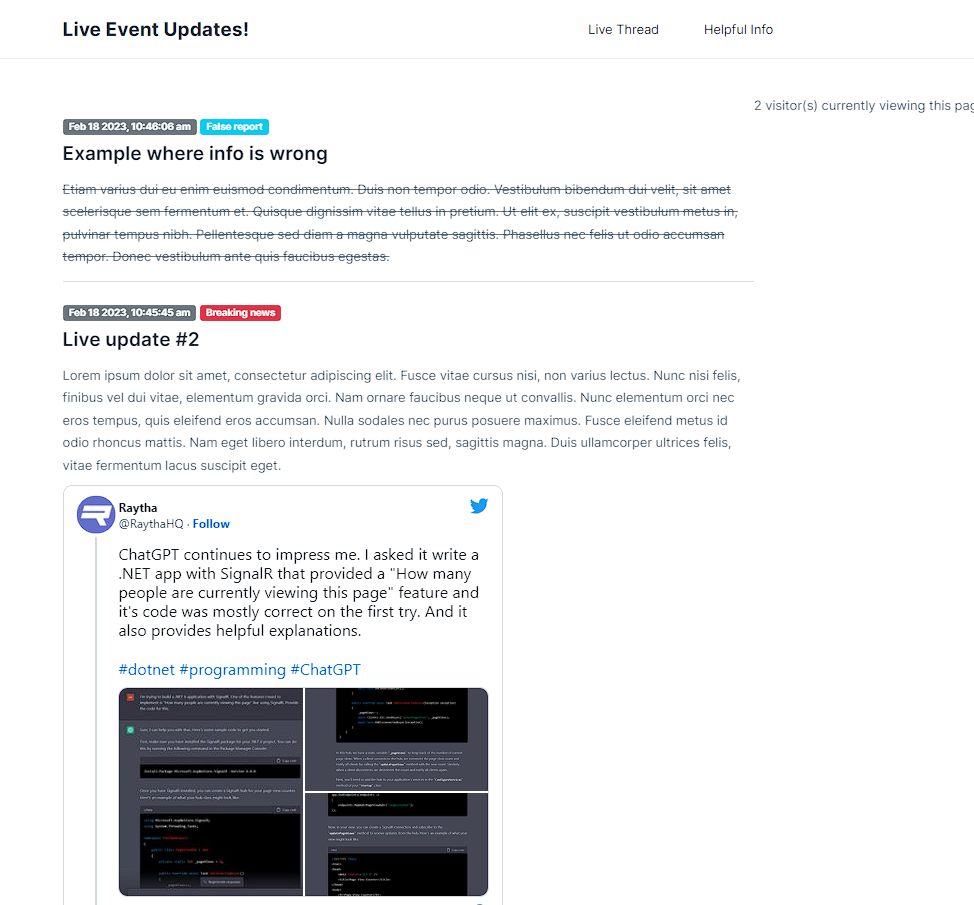
In the screenshot below, you'll see each post listed in reverse chronological order with its date and time, title, and content. If a post has been flagged as 'breaking news', a red badge will be displayed next to the title. Similarly, if a post contains false information, its content will be crossed out, and a blue badge indicating the false report will be displayed. If a post includes a link to a tweet, the tweet will be embedded at the bottom of the post. Finally, to help visitors track the thread's popularity, we've included a 'Number of visitors currently viewing this page' count in the top right corner. Additionally, we've added a standard Raytha content page called 'Helpful Info,' which serves as a static reference for visitors who want more information during the event.

Screenshot of our live reddit thread


The liquid syntax code to setup this layout is: 

<section class="ud-wrapper ud-page">
  <div class="container">
    <div class="d-flex justify-content-center">
      <div class="col-lg-8" id="live-updates">
        {% for item in Target.Items %}
          <div class="ud-single-blog" id="item-{{ item.Id }}">
            <div class="ud-blog-content">
              <span class="badge bg-secondary mb-2">{{ item.CreationTime | organization_time: '%b %e %Y, %l:%M:%S %P' }}</span>
              {% if item.PublishedContent.breaking_news.Value %}
                  <span class="badge bg-danger mb-2">Breaking news</span>
              {% endif %}
              {% if item.PublishedContent.information_is_wrong.Value %}
                  <span class="badge bg-info mb-2">False report</span>
              {% endif %}

              <h2 class="ud-blog-title">
                <a href="/{{ item.RoutePath }}">
                  {{ item.PrimaryField }}
                </a>
              </h2>
              {% if item.PublishedContent.content and item.PublishedContent.information_is_wrong.Value %}
                <div class="ud-blog-desc">
                  <del>{{ item.PublishedContent.content }}</del>
                </div>
              {% elsif item.PublishedContent.content %}
                <div class="ud-blog-desc">
                  {{ item.PublishedContent.content }}
                </div>
              {% endif %}
              {% if item.PublishedContent.link_to_tweet.Value %}
                 <blockquote class="twitter-tweet">
                     <a href="https://twitter.com/RaythaHQ/status/{{ item.PublishedContent.link_to_tweet.Value }}">Tweet</a>
                 </blockquote>
              {% endif %}
            </div>
          </div>
          <hr/>
        {% endfor %}
        <nav aria-label="page navigation" class="py-4">
          {% if Target.TotalCount == 1 %}
            <p>{{ Target.TotalCount }} result</p>
          {% else %}
            <p>{{ Target.TotalCount }} results</p>
          {% endif %}
          <ul class="pagination">
            <li class="page-item {% if Target.PreviousDisabledCss %}disabled{% endif %}">
              <a href="/{{ Target.RoutePath }}?pageNumber={{ Target.PageNumber | minus: 1 }}" class="page-link">
				 «
			  </a>
            </li>
            {% if Target.FirstVisiblePageNumber > 1 %}
              <li class="page-item disabled">
                <a class="page-link">...</a>
              </li>
            {% endif %}
            {% for i in (Target.FirstVisiblePageNumber..Target.LastVisiblePageNumber) %}
              <li class="page-item {% if Target.PageNumber == i %}active{% endif %}">
                <a href="/{{ Target.RoutePath }}?pageNumber={{ i }}" class="page-link">{{ i }}</a>
              </li>
            {% endfor %}

            {% if Target.LastVisiblePageNumber < Target.TotalPages %}
              <li class="page-item disabled">
                <a class="page-link">...</a>
              </li>
            {% endif %}
            <li class="page-item {% if Target.NextDisabledCss %}disabled{% endif %}">
              <a href="/{{ Target.RoutePath }}?pageNumber={{ Target.PageNumber | plus: 1 }}" class="page-link">
				 »
			  </a>
            </li>
          </ul>
        </nav>
      </div>
      <div class="col-lg-4">
        <p><span id="numViewers"></span> visitor(s) currently viewing this page</p>
      </div>
    </div>
  </div>
</section>

I'm pleased with the results of our efforts. In less than an hour, we were able to replicate much of Reddit Live's functionality using the Raytha platform. Not bad at all! However, there's still one major feature we're missing: real-time page refresh using web sockets. Visitors to Reddit Live expect the page to update instantly as new posts are added or changes are made to existing ones. This way, visitors don't have to manually refresh the page themselves to see the latest updates. For this, we have to extend Raytha's functionality using .NET / C# and more specifically, SignalR.

Implement SignalR for real time updates

To get started with SignalR with .NET, you have two options: One, dig through the official SignalR documentation...or two, just ask ChatGPT to give you the code.

ChatGPT gives us the starter boilerplate code conveniently, but we want to integrate SignalR with the Raytha platform, and more specifically, it should trigger an update for a visitor when there is both a new post, and an update to an existing post.

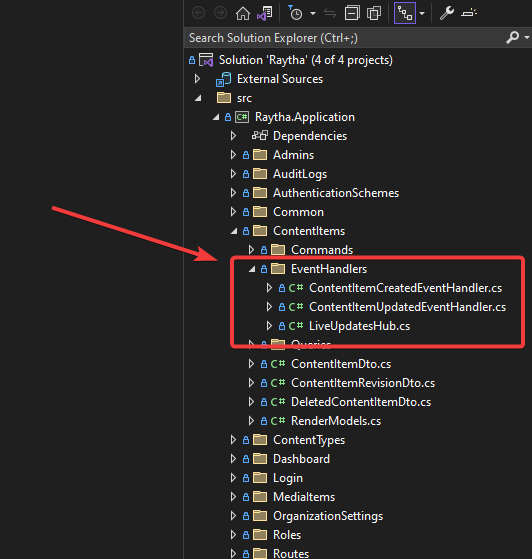
To accomplish this, we create a directory called EventHandlers and create handlers for both ContentItemCreatedEvent and ContentItemUpdatedEvent. For convenience, we place our LiiveUpdatesHub in the folder too.

New folder for these event handlers


Here is our ContentItemCreatedEventHandler.

public class ContentItemCreatedEventHandler : INotificationHandler<ContentItemCreatedEvent>
{
    private readonly ICurrentOrganization _currentOrganization;
    private readonly IHubContext<LiveUpdatesHub> _hubContext;

    public ContentItemCreatedEventHandler(
        ICurrentOrganization currentOrganization,
        IHubContext<LiveUpdatesHub> hubContext)
    {
        _currentOrganization = currentOrganization;
        _hubContext = hubContext;
    }

    public async Task Handle(ContentItemCreatedEvent notification, CancellationToken cancellationToken)
    {
        var viewModel = new LiveUpdatesHub_RenderModel
        {
            Id = notification.ContentItem.Id,
            CreationTime = _currentOrganization.TimeZoneConverter.UtcToTimeZone(notification.ContentItem.CreationTime).ToString(),
            PublishedContent = notification.ContentItem.PublishedContent
        };
        await _hubContext.Clients.All.SendAsync("new_live_update", viewModel);
    }
}

The ContentItemUpdatedEventHandler is very similar -- only difference is that it sends a 'replace_live_update' signal instead.

LiveUpdatesHub code came from ChatGPT:

using Microsoft.AspNetCore.SignalR;

namespace Raytha.Application.ContentItems.EventHandlers;

public class LiveUpdatesHub : Hub
{
    private static int _pageViews = 0;

    public override async Task OnConnectedAsync()
    {
        _pageViews++;
        await Clients.All.SendAsync("updatePageViews", _pageViews);
        await base.OnConnectedAsync();
    }

    public override async Task OnDisconnectedAsync(Exception exception)
    {
        _pageViews--;
        await Clients.All.SendAsync("updatePageViews", _pageViews);
        await base.OnDisconnectedAsync(exception);
    }
}

public record LiveUpdatesHub_RenderModel
{
    public Guid Id { get; init; }
    public string CreationTime { get; init; }
    public IDictionary<string, object> PublishedContent { get; init; }
}

Wire up the SignalR C# code to Raytha templates

The above backend code modification portion only took about 15 minutes -- that was the easy part in my opinion. The hard part is the client side javascript where we need to update the page's HTML with the new content we receive from SignalR.

In the _Layout, I include a reference to SignalR's javascript CDN:

<script src="https://cdnjs.cloudflare.com/ajax/libs/microsoft-signalr/6.0.1/signalr.js"></script>

and at the end of the body of the content, since we want Twitter embeds to work, we include:

<script async src="https://platform.twitter.com/widgets.js" charset="utf-8"></script>

But ultimately, most of the work goes into the javascript for manipulating the page after connecting to SignalR.

<script>
  function breakingNewsHTML(isBreakingNews) {
    if (isBreakingNews) {
      return `<span class="badge bg-danger mb-2">Breaking news</span>`;
    } else {
      return ``;
    }
  }

  function isFalseReportHTML(isFalseReport) {
    if (isFalseReport) {
      return `<span class="badge bg-info mb-2">False report</span>`;
    } else {
      return ``;
    }
  }

  function contentHTML(isFalseReport, content) {
    if (isFalseReport) {
      return `<del>${content}</del>`;
    } else {
      return content;
    }
  }

  function tweetHTML(tweet) {
    if (tweet != '' && tweet != undefined) {
      return `<blockquote class="twitter-tweet">
                <a href="${tweet}">Tweet</a>
              </blockquote>`;
    } else {
      return ``;
    }
  }

  function getLiveUpdateHTML(data) {
    return `
          <div class="ud-single-blog" id="item-${data.id}">
            <div class="ud-blog-content">
              <span class="badge bg-secondary mb-2">${data.creationTime}</span>
              ${breakingNewsHTML(data.publishedContent.breaking_news)}
              ${isFalseReportHTML(data.publishedContent.information_is_wrong)}
              <h2 class="ud-blog-title">
                  ${data.publishedContent.title}
              </h2>

                <div class="ud-blog-desc">
                  ${contentHTML(data.publishedContent.information_is_wrong, data.publishedContent.content)}
                </div>
                  ${tweetHTML(data.publishedContent.link_to_tweet)}
            </div>
          </div>
          <hr/>`;
  }
const connection = new signalR.HubConnectionBuilder()
    .withUrl("/liveupdates")
    .build();

connection.start()
    .then(() => console.log("SignalR connected"))
    .catch(console.error);

connection.on("updatePageViews", function (pageViews) {
  const numViewers = document.getElementById("numViewers");
  numViewers.innerText = pageViews;
});

connection.on("new_live_update", (data) => {
    console.log(data);

    const notificationsList = document.getElementById("live-updates");
    const newNotification = document.createElement("div");

    newNotification.innerHTML = getLiveUpdateHTML(data);
    console.log(newNotification.innerHTML);

    //add to the top of the list
    notificationsList.prepend(newNotification);

    //render twitter embed
    twttr.widgets.load(newNotification);
});

connection.on("replace_live_update", (data) => {
    console.log(data);

    const notificationToReplace = document.getElementById(`item-${data.id}`);
    notificationToReplace.innerHTML = getLiveUpdateHTML(data);

    //render twitter embed
    twttr.widgets.load(notificationToReplace);
});
</script>

The code above updates the live page in real time on 3 separate triggers:

  • updatePageViews - when a new user connects, it will update the content that indicates how many people are currently viewing the page in real time.
  • new_live_update - add the new post to the top of the page when one is posted to its visitors.
  • replace_live_update - modify an existing post if a post was updated.

You can see an animation below where we make a new post in one window and you can see the post appear instantly at the top on the other window:

Animation of a real time update


We hope you found this post enjoyable and get to see the power of how the Raytha content management system can get you from 0 to 90% and then tie it all together with a tiny bit of C# if you want to add more functionality.

Check out Raytha on github and give us a star!

picture of the author
Zack Schwartz @apexdodge

ENTREPRENEUR & SOFTWARE ENGINEER, AUSTIN, TX
I enjoy tackling a wide array of business challenges ranging from front line product support and operations to sales and marketing efforts. My core expertise is in software development building enterprise level web applications.


Subscribe to the Raytha newsletter